2023. 12. 18. 22:43ㆍpython/basic
프로젝트 개요
이 튜토리얼에서는 MkDocs 및 mkdocstrings를 사용하여 Python 패키지에 대한 문서를 빠르게 작성하는 방법을 배웁니다. 이러한 도구를 사용하면 Markdown 파일 및 코드의 docstring에서 보기 좋고 현대적인 문서를 생성할 수 있습니다.
MkDocs 테마용 자료는 추가 노력 없이 문서를 보기 좋게 만들어줍니다. Typer CLI 및 FastAPI 같은 대중적인 프로젝트에서 사용됩니다.
- MkDocs를 사용하여 Markdown에서 정적 페이지 생성
- mkdocstrings를 사용하여 docstring에서 코드 문서를 가져오기
- 프로젝트 문서를 보려면 모범 사례를 따르세요
- MkDocs 테마용 자료를 사용하여 문서를 보기 좋게 만드세요
- 호스트 문서를 GitHub 페이지에 호스팅하세요.
문서를 방향이 다른 네 가지 부분으로 분할할 것을 제안합니다.
- 튜토리얼: 학습 중심
- 안내 가이드: 문제 중심
- 참조: 정보 중심
- 설명: 이해 중심
프로젝트 문서를 방향이 다른 네 가지 목적으로 분할하면 Python 프로젝트에 대한 포괄적인 문서를 만드는 데 도움이 됩니다.
기술적인 관점에서 세 가지 Python 패키지를 사용하여 문서를 작성하게 됩니다.
- Markdown에서 정적 페이지를 구축하기 위한 MkDocs
- 코드의 독스트링에서 문서 자동 생성을 위한 mkdocstrings
- MkDoc용 자료문서 스타일 지정
전제조건
- 가상 환경: Python 가상 환경을 설정하고 그 안에서 작업하세요.
- 패키지 관리: Python 패키지를 설치하고 pip 자신만의 모듈 및 패키지 만들기 .
- 코드 문서화: 독스트링이 무엇인지, 어떤 구조를 따르는지, 어떤 정보를 포함해야 하는지, Python 프로젝트를 어떻게 문서화해야 하는지 이해하기.
- GitHub 저장소: GitHub에서 저장소를 생성 및 업데이트하여 문서를 호스팅하세요. 자세한 내용은 Git 및 GitHub 소개에서 알아볼 수 있습니다.
1단계: 문서 작성을 위한 환경 설정
인도우 파워셀
PS> mkdir mkdocs-documentation
PS> cd mkdocs-documentation
PS> python -m venv venv
PS> venv\Scripts\activate
(venv) PS> python -m pip install mkdocs
(venv) PS> python -m pip install "mkdocstrings[python]"
(venv) PS> python -m pip install mkdocs-materialSyntaxError: invalid syntax. Perhaps you forgot a comma? (3642152695.py, line 1)2단계: 샘플 Python 패키지 생성
예제 Python 프로젝트는 작으며 두 개의 파일이 포함된 하나의 폴더로만 구성됩니다.
calculator/ │ ├── init.py └── calculations.py
# calculator/calculations.py

def add(a, b):
    return float(a + b)

def subtract(a, b):
    return float(a - b)

def multiply(a, b):
    return float(a * b)

def divide(a, b):
    if b == 0:
        raise ZeroDivisionError("division by zero")
    return float(a / b)
3단계: Docstring 작성 및 형식 지정
Python Docstring 이해
Docstring은 Python 코드를 문서화하는 데 가장 큰 도움이 됩니다. 함수, 클래스, 모듈에 대한 사용법 지침과 정보를 보관하도록 구성할 수 있는 내장 문자열입니다.
Python docstring은 세 개의 큰따옴표 쌍(“““) 사이에 있는 텍스트로 구성됩니다. 가장 일반적으로 함수, 클래스 및 메서드 독스트링을 읽고 쓰게 됩니다. 이러한 경우 독스트링은 클래스, 메소드 또는 함수를 정의하는 줄 바로 아래에 위치합니다.
def greet(name):
    """Print a greeting.

    Args:
        name (str): The name of the person to greet.
    """
    print(f"Hello {name}!")
함수나 메소드에 대한 독스트링은 해당 동작을 요약하고 인수, 반환 값, 부작용, 발생한 예외 및 호출 가능 시기에 대한 제한 사항(해당되는 경우 모두)을 문서화해야 합니다.
Docstring은 작업 중인 코드를 더 쉽게 이해하는 데 도움이 될 수 있습니다. 코드 개체에 대한 정보를 제공합니다. 독스트링을 잘 작성하면 객체의 컨텍스트와 사용이 명확해집니다.
내장된 help() 함수를 사용하여 독스트링에 저장된 정보에 액세스할 수 있습니다:
help(greet)Help on function greet in module __main__:
greet(name)
Print a greeting.
Args:
name (str): The name of the person to greet.
객체의 독스트링은 .__doc__에 저장되며, 여기서 직접 검사할 수도 있습니다.
greet.__doc__'Print a greeting.\n\n Args:\n name (str): The name of the person to greet.\n '모든 Python 독스트링의 기본 구문은 동일하지만, 독스트링이 문서화하는 내용에 따라 다른 위치에서 찾을 수 있습니다.
MkDocs는 세 가지 일반적인 유형의 Python Docstring 형식을 지원합니다.
- Google 스타일 Docstring
- NumPy Docstring 표준
- 스핑크스 독스트링 형식
Python 프로젝트에 함수 Docstring 추가
def add(a, b):
    """Compute and return the sum of two numbers."""
    return float(a + b)
def add(a, b):
"""Compute and return the sum of two numbers.
Args:
a (float): A number representing the first addend in the addition.
b (float): A number representing the second addend in the addition.
Returns:
float: A number representing the arithmetic sum of `a` and `b`.
"""
return float(a + b)# calculations.py
def add(a, b):
"""Compute and return the sum of two numbers.
Examples:
>>> add(4.0, 2.0)
6.0
>>> add(4, 2)
6.0
Args:
a (float): A number representing the first addend in the addition.
b (float): A number representing the second addend in the addition.
Returns:
float: A number representing the arithmetic sum of `a` and `b`.
"""
return float(a + b)
def subtract(a, b):
"""Calculate the difference of two numbers.
Args:
a (float): A number representing the minuend in the subtraction.
b (float): A number representing the subtrahend in the subtraction.
Returns:
float: A number representing the difference between `a` and `b`.
"""
return float(a - b)
def multiply(a, b):
"""Compute and return the product of two numbers.
Args:
a (float): A number representing the multiplicand in the multiplication.
b (float): A number representing the multiplier in the multiplication.
Returns:
float: A number representing the product of `a` and `b`.
"""
return float(a * b)
def divide(a, b):
"""Compute and return the quotient of two numbers.
Args:
a (float): A number representing the dividend in the division.
b (float): A number representing the divisor in the division.
Returns:
float: A number representing the quotient of `a` and `b`.
Raises:
ZeroDivisionError: An error occurs when the divisor is `0`.
"""
if b == 0:
raise ZeroDivisionError("division by zero")
return float(a / b)Doctest를 사용하여 예제 작성 및 테스트
(venv) PS> python -m doctest calculator.py
출력이 표시되지 않으면 모든 테스트가 통과된 것입니다. 훌륭합니다. 함수에 doctest를 성공적으로 추가했습니다!
# calculations.py

def add(a, b):
    """Compute and return the sum of two numbers.

    Examples:
        >>> add(4.0, 2.0)
        6.0
        >>> add(4, 2)
        6.0

    Args:
        a (float): A number representing the first addend in the addition.
        b (float): A number representing the second addend in the addition.

    Returns:
        float: A number representing the arithmetic sum of `a` and `b`.
    """
    return float(a + b)

def subtract(a, b):
    """Calculate the difference of two numbers.

    Examples:
        >>> subtract(4.0, 2.0)
        2.0
        >>> subtract(4, 2)
        2.0

    Args:
        a (float): A number representing the minuend in the subtraction.
        b (float): A number representing the subtrahend in the subtraction.

    Returns:
        float: A number representing the difference between `a` and `b`.
    """
    return float(a - b)

def multiply(a, b):
    """Compute and return the product of two numbers.

    Examples:
        >>> multiply(4.0, 2.0)
        8.0
        >>> multiply(4, 2)
        8.0

    Args:
        a (float): A number representing the multiplicand in the multiplication.
        b (float): A number representing the multiplier in the multiplication.

    Returns:
        float: A number representing the product of `a` and `b`.
    """
    return float(a * b)

def divide(a, b):
    """Compute and return the quotient of two numbers.

    Examples:
        >>> divide(4.0, 2.0)
        2.0
        >>> divide(4, 2)
        2.0
        >>> divide(4, 0)
        Traceback (most recent call last):
        ...
        ZeroDivisionError: division by zero

    Args:
        a (float): A number representing the dividend in the division.
        b (float): A number representing the divisor in the division.

    Returns:
        float: A number representing the quotient of `a` and `b`.

    Raises:
        ZeroDivisionError: An error occurs when the divisor is `0`.
    """
    if b == 0:
        raise ZeroDivisionError("division by zero")
    return float(a / b)
유형 힌트를 사용하여 자동 유형 정보 제공
지금까지 작성한 독스트링에서는 입력 변수가 float 유형이어야 한다고 선언했습니다. 그러나 함수는 정수를 사용할 때에도 잘 작동합니다. 심지어 Doctest에 작성한 함수 호출을 통해 이에 대한 증거도 있습니다!
그에 따라 독스트링의 인수 유형을 업데이트해야 할 것입니다. 그러나 독스트링에서 그렇게 하는 대신 Python 유형 힌트를 사용하여 함수의 인수 및 반환 유형을 선언합니다.
from typing import Union

def add(a: Union[float, int], b: Union[float, int]) -> float:
    """Compute and return the sum of two numbers.

    Examples:
        >>> add(4.0, 2.0)
        6.0
        >>> add(4, 2)
        6.0

    Args:
        a (float): A number representing the first addend in the addition.
        b (float): A number representing the second addend in the addition.

    Returns:
        float: A number representing the arithmetic sum of `a` and `b`.
    """
    return float(a + b)
코드에 유형 힌트를 추가하면 mypy와 같은 유형 검사기를 사용하여 발견하지 못할 수도 있는 유형 관련 오류를 포착할 수 있습니다.
from typing import Union

def add(a: Union[float, int], b: Union[float, int]) -> float:
    """Compute and return the sum of two numbers.

    Examples:
        >>> add(4.0, 2.0)
        6.0
        >>> add(4, 2)
        6.0

    Args:
        a: A number representing the first addend in the addition.
        b: A number representing the second addend in the addition.

    Returns:
        A number representing the arithmetic sum of `a` and `b`.
    """
    return float(a + b)
# calculations.py
from typing import Union
def add(a: Union[float, int], b: Union[float, int]) -> float:
"""Compute and return the sum of two numbers.
Examples:
>>> add(4.0, 2.0)
6.0
>>> add(4, 2)
6.0
Args:
a: A number representing the first addend in the addition.
b: A number representing the second addend in the addition.
Returns:
A number representing the arithmetic sum of `a` and `b`.
"""
return float(a + b)
def subtract(a: Union[float, int], b: Union[float, int]) -> float:
"""Calculate the difference of two numbers.
Examples:
>>> subtract(4.0, 2.0)
2.0
>>> subtract(4, 2)
2.0
Args:
a: A number representing the minuend in the subtraction.
b: A number representing the subtrahend in the subtraction.
Returns:
A number representing the difference between `a` and `b`.
"""
return float(a - b)
def multiply(a: Union[float, int], b: Union[float, int]) -> float:
"""Compute and return the product of two numbers.
Examples:
>>> multiply(4.0, 2.0)
8.0
>>> multiply(4, 2)
8.0
Args:
a: A number representing the multiplicand in the multiplication.
b: A number representing the multiplier in the multiplication.
Returns:
A number representing the product of `a` and `b`.
"""
return float(a * b)
def divide(a: Union[float, int], b: Union[float, int]) -> float:
"""Compute and return the quotient of two numbers.
Examples:
>>> divide(4.0, 2.0)
2.0
>>> divide(4, 2)
2.0
>>> divide(4, 0)
Traceback (most recent call last):
...
ZeroDivisionError: division by zero
Args:
a: A number representing the dividend in the division.
b: A number representing the divisor in the division.
Returns:
A number representing the quotient of `a` and `b`.
Raises:
ZeroDivisionError: An error occurs when the divisor is `0`.
"""
if b == 0:
raise ZeroDivisionError("division by zero")
return float(a / b)모듈 독스트링 추가
# calculator/calculations.py

"""Provide several sample math calculations.

This module allows the user to make mathematical calculations.

The module contains the following functions:

- `add(a, b)` - Returns the sum of two numbers.
- `subtract(a, b)` - Returns the difference of two numbers.
- `multiply(a, b)` - Returns the product of two numbers.
- `divide(a, b)` - Returns the quotient of two numbers.
"""

from typing import Union
# ...
이 예제 모듈 독스트링을 calculations.py의 맨 위에 추가하세요. 이 문서 문자열에는 마크다운 형식이 포함되어 있습니다. MkDocs는 문서 페이지의 HTML로 렌더링합니다.
함수 독스트링과 마찬가지로, 모듈의 사용 예제를 독스트링에 추가할 수도 있습니다.
# calculator/calculations.py

"""Provide several sample math calculations.

This module allows the user to make mathematical calculations.

Examples:
    >>> from calculator import calculations
    >>> calculations.add(2, 4)
    6.0
    >>> calculations.multiply(2.0, 4.0)
    8.0
    >>> from calculator.calculations import divide
    >>> divide(4.0, 2)
    2.0

The module contains the following functions:

- `add(a, b)` - Returns the sum of two numbers.
- `subtract(a, b)` - Returns the difference of two numbers.
- `multiply(a, b)` - Returns the product of two numbers.
- `divide(a, b)` - Returns the quotient of two numbers.
"""

from typing import Union
# ...
# calculator/__init__.py
"""Do math with your own functions.
Modules exported by this package:
- `calculations`: Provide several sample math calculations.
"""'Do math with your own functions.\n\nModules exported by this package:\n\n- `calculations`: Provide several sample math calculations.\n'4단계: MkDocs로 문서 준비
MkDocs 프로젝트 구조 만들기
MkDocs는 Markdown을 사용하여 정적 페이지를 구축할 수 있는 Python 패키지입니다. MkDocs 프로젝트의 기본 구조는 세 가지 주요 구성요소로 구성됩니다.
- 프로젝트 코드
- 모든 마크다운 문서 페이지는 docs/ 폴더 안에 있습니다
- mkdocs.yml 이름을 가진 지정된 구성 파일
Shell
(venv) $ mkdocs new .
mkdocs-documentation/ │ ├── calculator/ │ ├── init.py │ └── calculations.py │ ├── docs/ │ └── index.md │ ├── mkdocs.yml └── requirements.txt
프로젝트 설정 파일 조정
Mkdocs는 구성을 위해 YAML 파일을 사용합니다. new을 사용하여 새 프로젝트를 생성하면 MkDocs는 기본 mkdocs.yml 파일을 생성합니다.
mkdocs.yml
site_name: My Docs
YAML 세팅 파일에 두 번째 성분을 추가하면 이 튜트리얼 시작 부분에서 설치한 MkDocs 테마를 위한 인기 있는 내용과 함께 디폴트 테마를 대신할 수 있습니다.
mkdocs.yml
site_name: Calculation Docs
theme: name: “material”
(venv) $ mkdocs serve
INFO - Building documentation… INFO - Cleaning site directory INFO - Documentation built in 0.22 seconds [I 220510 0:0:0 server:335] Serving on http://127.0.0.1:8000 INFO - Serving on http://127.0.0.1:8000
위와 같이 터미널이 로컬 호스트에서 문서를 제공하고 있다고 알려주면 브라우저에서 해당 문서를 볼 수 있습니다.
귀하의 터미널에 인쇄된 정보는 MkDocs가 http://127.0.0.1:8000에서 귀하의 문서를 제공하고 있음을 알려줍니다. 해당 URL을 가리키는 새 브라우저 탭을 엽니다. Material for MkDocs 테마로 스타일이 지정된 사용자 정의 제목이 포함된 MkDocs 상용구 색인 페이지가 표시됩니다.
마크다운에서 정적 페이지 만들기
- 튜토리얼
- 방법 가이드
- 참조
- 설명
훌륭한 프로젝트 문서는 훌륭하게 렌더링된 함수 독스트링만으로 구성되지 않습니다!
프로젝트 문서의 구조를 설정하려면 다양한 부분을 나타내는 4개의 추가 Markdown 파일을 만듭니다.
- docs/tutorials.md
- docs/how-to-guides.md
- docs/reference.md
- docs/explanation.md
이 4개의 파일을 추가하면 docs/ 폴더에 5개의 Markdown 파일이 포함됩니다.
docs/ ├── explanation.md ├── how-to-guides.md ├── index.md ├── reference.md └── tutorials.md
mkdocs.yml
site_name: Calculation Docs
theme: name: “material”
nav: - index.md - tutorials.md - how-to-guides.md - reference.md - explanation.md
모든 문서 페이지의 파일 이름을 적절한 들여쓰기와 함께 nav 요소 아래에 추가했습니다. 페이지 제목이 마음에 들지 않으면 선택적으로 제목을 변경하려는 파일 이름 앞에 다른 요소를 추가할 수 있습니다.
mkdocs.yml
site_name: Calculation Docs
theme: name: “material”
nav: - Calculation Docs: index.md - tutorials.md - How-To Guides: how-to-guides.md - reference.md - explanation.md
index.md
This site contains the project documentation for the calculator project that is a toy module used in the Real Python tutorial Build Your Python Project Documentation With MkDocs. Its aim is to give you a framework to build your project documentation using Python, MkDocs, mkdocstrings, and the Material for MkDocs theme.
Table Of Contents
The documentation follows the best practice for project documentation as described by Daniele Procida in the Diátaxis documentation framework and consists of four separate parts:
Quickly find what you’re looking for depending on your use case by looking at the different pages.
Acknowledgements
I want to thank my house plants for providing me with a negligible amount of oxygen each day. Also, I want to thank the sun for providing more than half of their nourishment free of charge.
tutorials.md
This part of the project documentation focuses on a learning-oriented approach. You’ll learn how to get started with the code in this project.
Note: Expand this section by considering the following points:
- Help newcomers with getting started
- Teach readers about your library by making them write code
- Inspire confidence through examples that work for everyone, repeatably
- Give readers an immediate sense of achievement
- Show concrete examples, no abstractions
- Provide the minimum necessary explanation
- Avoid any distractions
how-to-guides.md
This part of the project documentation focuses on a problem-oriented approach. You’ll tackle common tasks that you might have, with the help of the code provided in this project.
How To Add Two Numbers?
You have two numbers and you need to add them together. You’re in luck! The calculator package can help you get this done.
Download the code from this GitHub repository and place the calculator/ folder in the same directory as your Python script:
your_project/
│
├── calculator/
│   ├── __init__.py
│   └── calculations.py
│
└── your_script.py
Inside of your_script.py you can now import the add() function from the calculator.calculations module:
# your_script.py
from calculator.calculations import add
After you’ve imported the function, you can use it to add any two numbers that you need to add:
# your_script.py
from calculator.calculations import add

print(add(20, 22))  # OUTPUT: 42.0
You’re now able to add any two numbers, and you’ll always get a float as a result.
reference.md
This part of the project documentation focuses on an information-oriented approach. Use it as a reference for the technical implementation of the calculator project code.
explanation.md
This part of the project documentation focuses on an understanding-oriented approach. You’ll get a chance to read about the background of the project, as well as reasoning about how it was implemented.
Note: Expand this section by considering the following points:
- Give context and background on your library
- Explain why you created it
- Provide multiple examples and approaches of how to work with it
- Help the reader make connections
- Avoid writing instructions or technical descriptions here
MkDocs는 문서 작성을 위한 정적 사이트 생성기입니다. 그러나 MkDocs만 사용하여 코드에서 독스트링 정보를 가져올 수는 없습니다. mkdocstrings라는 추가 패키지를 사용하여 작동하게 할 수 있습니다.
mkdocs.yml
site_name: Calculation Docs
theme: name: “material”
plugins: - mkdocstrings
nav: - Calculation Docs: index.md - tutorials.md - How-To Guides: how-to-guides.md - reference.md - explanation.md
Mkdocstrings를 사용하면 세 개의 콜론(:::) 뒤에 문서화하려는 코드 식별자로 구성된 특수 구문을 사용하여 Docstring 정보를 Markdown 페이지에 바로 삽입할 수 있습니다.
Markdown text
::: identifier
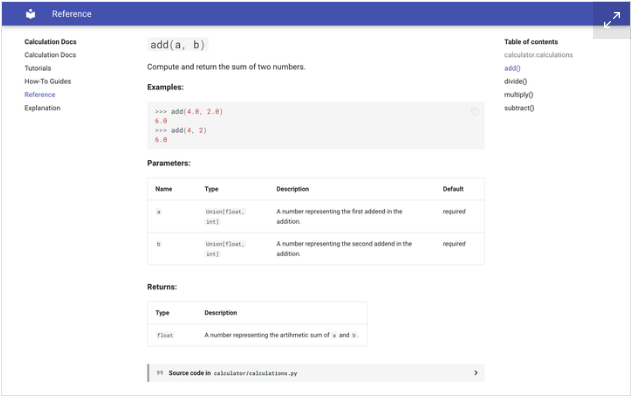
코드 참조의 중앙 부분은 reference.md에 들어가며 mkdocstrings가 docstring을 기반으로 자동으로 추가하도록 합니다.
Markdown text
This part of the project documentation focuses on an information-oriented approach. Use it as a reference for the technical implementation of the calculator project code.
::: calculator.calculations
Markdown 파일에 한 줄만 추가했지만 로컬 호스트에서 참조 페이지를 보면 mkdocstrings가 calculator/calculations.py 렌더링한 내용은 다음과 같습니다.
index.md
This site contains the project documentation for the calculator project that is a toy module used in the Real Python tutorial Build Your Python Project Documentation With MkDocs. Its aim is to give you a framework to build your project documentation using Python, MkDocs, mkdocstrings, and the Material for MkDocs theme.
Table Of Contents
The documentation follows the best practice for project documentation as described by Daniele Procida in the Diátaxis documentation framework and consists of four separate parts:
Quickly find what you’re looking for depending on your use case by looking at the different pages.
Project Overview
::: calculator
Acknowledgements
I want to thank my house plants for providing me with a negligible amount of oxygen each day. Also, I want to thank the sun for providing more than half of their nourishment free of charge.
5단계: MkDocs를 사용하여 문서 작성
(venv) $ mkdocs build
이 명령을 사용하여 문서를 빌드하면 MkDocs는 HTML 페이지로 변환된 문서와 MkDocs 테마 머티리얼을 빌드하는 데 필요한 모든 정적 자산이 포함된 site/ 디렉토리를 생성합니다.
site/ │ ├── assets/ │ │ │ ├── … │ │ │ └── _mkdocstrings.css │ ├── explanation/ │ └── index.html │ ├── how-to-guides/ │ └── index.html │ ├── reference/ │ └── index.html │ ├── search/ │ └── search_index.json │ ├── tutorials/ │ └── index.html │ ├── 404.html ├── index.html ├── objects.inv ├── sitemap.xml └── sitemap.xml.gz
6단계: GitHub에 문서 호스팅
GitHub 리포지토리 만들기
(venv) $ git init (venv) $ git remote add origin https://github.com/your-username/repo-name.git
(venv) $ git add . (venv) $ git commit -m “Add project code and documentation” (venv) $ git push origin main
참고: Git의 로컬 기본 분기는 대신 master로 호출될 수 있습니다. 그렇다면 로컬 지점의 이름을 main으로 바꿀 수 있습니다.
(venv) $ git branch -m master main
이 명령을 실행하여 로컬 Git 분기 이름을 master에서 main로 바꾸세요. 그런 다음 push을 다시 실행하여 프로젝트 파일을 원격 GitHub 저장소로 보낼 수 있습니다.
GitHub에 문서 배포
(venv) $ mkdocs gh-deploy
이 명령을 실행하면 Markdown 파일과 소스 코드에서 문서를 다시 작성하고 gh-pages 원격 GitHub 저장소의 분기로 푸시합니다.
이제 mkdocstring을 사용하여 docstring에서 부분적으로 자동 생성되고 MkDocs를 통해 프런트엔드 사용을 위해 구축된 프로젝트 문서를 위한 잘 구조화된 기반이 생겼습니다. GitHub 페이지를 통해 온라인으로 제공하기도 했습니다!
출처 : https://realpython.com/python-project-documentation-with-mkdocs/
'python > basic' 카테고리의 다른 글
| Tkinter를 사용한 Python GUI 프로그래밍2 (1) | 2023.12.20 |
|---|---|
| Tkinter를 사용한 Python GUI 프로그래밍1 (0) | 2023.12.19 |
| Python에서 Do-While 루프를 어떻게 에뮬레이트할 수 있습니까? (0) | 2023.12.17 |
| Python에서 절대값을 찾는 방법 (0) | 2023.12.17 |
| Python 문자열에 하위 문자열이 포함되어 있는지 확인하는 방법 (1) | 2023.12.17 |